Discover the tools for nail art designs I personally love in 2026. My tried-and-tested favorites for flawless, salon-quality nails at home.
Table of Contents
Featured Snippet Hook
3D nails add gems and textures for bold designs. I’ve tried them—they stand out and last well when sealed with gel, perfect for eye-catching nail art.
Introduction
Nail art has grown from basic refinement to inspired designs that show your elegance and personality. With the correct nail design gears, even simple nails can look fresh and expert.
Today’s trends blend colors, textures, and tiny accents, creation DIY nail art easier for beginners and enjoyable for pros. From dots to 3D charms, every method opens new creative designs.
✨ Quick Tip: Start with a minor beginner-friendly toolkit.
Ultimate Guide to Nail Art Design for Nails
Nail art is more than style—it shows your personality. I started with simple tools like brushes and dotting pens. In 2026, gel pens and chrome powders give pro results at home.
If you ask, “what tools for nail art designs?”—start basic. Rare tip: use fewer tools first—this improves control and cleaner designs faster.
What Kind of Brush Should You Use for Nail Art?
Choosing the right brush matters. I use a thin detail brush for lines and a flat brush for blends. In 2026, nylon brushes hold polish better and last longer.
If you ask, “best brush for nail art?”—start with a small set. Rare tip: keep one brush for each color type to avoid muddy designs.
What Are Five Basic Nail Art Designs?
Start with simple nail art to build skill. I began with dots, lines, and small flowers—they’re easy and look clean. Use basic tools like dotting pens and thin brushes for control.
Practice on tips first, not your nails. Try one design at a time and repeat it—this builds steady hands and better results fast.
What Can I Use to Draw Nail Art?
Nail art gets easy with the right tools. I use thin brushes for lines, dotting tools for dots, and gel pens for clean shapes. Sponges help blend colors smoothly.
Stamping works fast for complex designs. Practice on tips first. Keep your hand steady and rest your finger on a surface—this helps you draw cleaner lines and avoid mistakes.
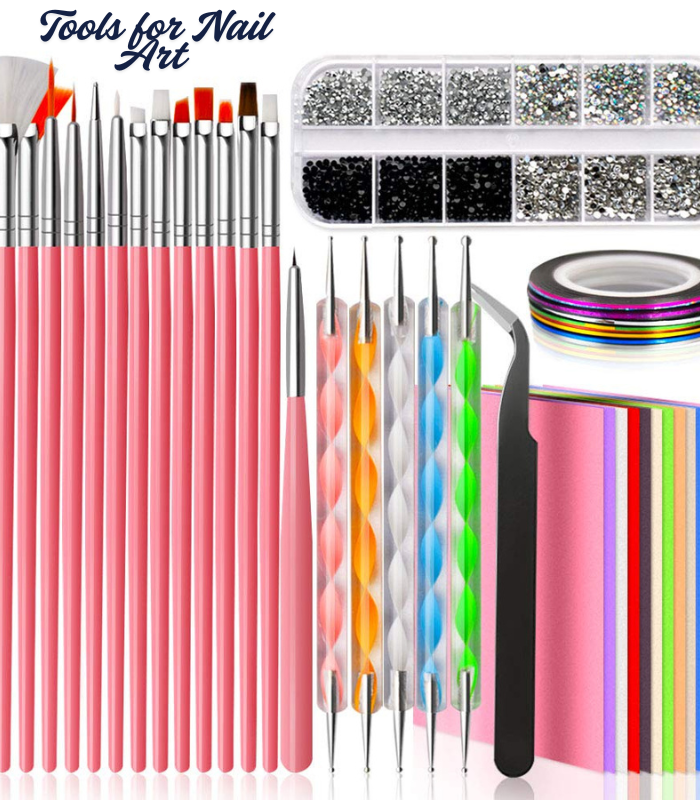
Tools Used in Nail Art Design
- I use fine liner brushes for clean lines and small details
- Dotting tools help me make neat dots and patterns fast
- Blend brushes or sponges work best for soft color fades
- Nail files and buffers give a smooth base before art
- Foil and chrome tools add shine and texture
- Keep tools clean after use—this keeps designs sharp and neat

SAVILAND Essentials Nail Art Pens Set: 48 Colors Quick-Drying 3D Nail Polish Pens Acrylic Paint Markers for Nail Art Painting Drawing Liner Brush Dotting Tools Kit for Home DIY & Salon Manicure
Price : $69.99
Verified Seller | Fast Shipping | Medical-Grade
👉 Shop Now – Create cleaner lines and smoother designs with the Essentials Nail Art Pens Set!
💡 Note: This post may contain affiliate links. If you purchase through these links, I may earn a small commission at no extra cost to you.
Nail Art Tools Name List
Here’s a handy list of tools every nail artist can use:
- Dotting pens – perfect for polka dots and tiny details
- Striping brushes – ideal for lines and stripes
- Fine detail brushes – for intricate patterns and florals
- Stamping plates & scrapers – for quick, precise designs
- Tweezers – to place rhinestones or tiny decals
- Sponges – for gradients and ombre effects
- Nail files & buffers – prep and shape nails
- Rhinestones & charms – add 3D sparkle
This list helps both beginners and pros keep their kit organized and ready for creative designs.
Professional Tools for Nail Art Designs
- I use ultra-thin liner brushes for sharp, clean designs
- Gel brushes help me control product and avoid mess
- Silicone tools are great for shaping 3D nail art
- Stamping plates save time for detailed patterns
- Airbrush tools help create smooth ombré looks
- Use good-quality, safe gels—this keeps nails strong and results long-lasting
Basic Tools for Nail Art Designs
Beginners can start nail art with simple tools. I began with a thin brush, dotting tool, buffer, and sponge—it was enough to learn basics.
These help you make dots, lines, and soft blends easily. Use good tools for better control and safety. Practice on nail tips first, then move to real nails to build steady skills.
👉 Want a gentler, long-lasting nail option? Read my full guide on What is SNS Nails to see why it’s trending in 2026.
Shiny Chrome Nail Designs for a Futuristic Look
Chrome nails give a shiny, mirror look. I tried them—they catch light and look bold. Use chrome powder, gel top coat, and a soft applicator.
Start with one nail to learn the method. Apply powder on a smooth, no-wipe top coat—this helps it stick better and gives a cleaner finish without patches.
3D Embellished Nails That Make a Statement
3D nails add depth and stand out. I’ve used small gems and charms—they made my nails look bold. Start with tiny pieces and place them with tweezers.
Use builder gel to hold them well. Cure each layer before adding more—this keeps the design strong and stops pieces from falling off.
Botanical Line Art With Leaves and Flowers
Botanical row art nails proposal a soft, natural aesthetic inspired by simple plant sketches. With the correct tools for nail art designs, you can outline tiny leaves, curved stems, and floral forms using ultra-thin liners or precision gel guidelines. In 2026, pairing fresh botanical outlines with misty pastels or brushed chrome highlights is trending for a up-to-date, airy texture.
Beginners can start with a each motif on one nail, while skilled artists blend multiple herbal basics to make a refined, garden-style look that textures artistic yet everyday-friendly.
Galaxy-Inspired Nails With Stars and Sparkle
Galaxy nails distribute a dreamy, outer-space atmosphere with soft blends and shimmering details. With the correct tools for nail art designs, you can sweep night tones across the nail and tap in brighter shades to make depth. In 2026, celestial appearances often include reflective pigments that mimic shifting twinkle.
Beginners can attempt a humble night-sky fade, while innovative artists build swirling nebula outlines, scattered micro-sparkles, and tiny accent studs for a striking, cosmic-inspired manicure.
Iridescent Aura Gradient Nail Styles
Iridescent gradient nails give a lax, magical light that shifts colors beautifully in the bright. Using tools for nail art designs, you can mixture pastel or metallic shades with a sponge or brush to make a smooth aura result.
2026 trends favor pairing this elegance with minimal line painting, tiny gems, or subtle chrome accents for a dreamy, up-to-date look. Beginners should training on one nail first to faultless blending, while pros can layer many colors for a stunning gradient that catches attention from all angle.
Real-Life Examples / User Comments
- “I tried the 3D embellishments for a party—everyone loved my nails!” – Sarah K.
- “Galaxy nails were tricky at first, but using a sponge made them look amazing.” – Jasmine P.
- “The aura gradient design is my new favorite; looks professional even at home.” – Mia L.
Final Thought
Mastering nail art comes down to imagination, steady practice, and using the correct tools for nail art designs. Whether you choose subtle specifics or bold textures, decent gears help you make fresh lines and long-lasting effects.
Even beginners can build impressive appearances by starting minor and trying new methods. Keep testing with fresh trends, blend dissimilar materials, and let each manicure reflect your private style. With consistency and inspiration, your nails can position out every time.
FAQs
- Q1: How do I start learning tools for nail art designs?
A: Begin with a small starter kit including basic brushes, dotting tools, and simple polishes. Practice simple designs like dots and stripes before moving to 3D or gradient styles. - Q2: Can beginners use professional tools?
A: Yes! Professional tools enhance precision, but start with basic brushes and gradually upgrade. - Q3: How do I maintain my nail art longer?
A: Apply a good top coat, avoid harsh chemicals, and wear gloves when cleaning.
Meet Ava
I’m a beauty professional with over 6 years of experience in nail care, lash artistry, and premium hair styling. On NailBeautyZone, I break down global beauty trends with a focus on product safety and hypoallergenic chemistry.
Find my latest tips and updates on LinkedIn, GitHub, Medium, Quora, X, and Pinterest. If I haven’t personally tested and trusted it, I don’t recommend it.
Leave a Reply